Some tips for digital audio mastering (with budget gear)

by LMan


I made this quick crash course tutorial to share a basic impression of what's important for mixing and mastering on digital gear. There are some pointers, tips and hints to help you getting the most out of your freshly composed tune. I've got some info about compressors, mixing, and mastering.


Clipping

In a digital studio environment, clipping is to be avoided where possible. Clipping means, that your audio signal exceeds -0 dB, in the digital world that means any audio information beyond that point is irrecoverably lost. Almost every effects plugin, mixer, etc. has an indicator for clipping - and a knob/slider to reduce volume. Check at every possible station of your audio-route if there's clipping. The loss of volume you might notice doesn't really matter, you'll recover that during the mastering process. So make sure all your channels have enough headroom!


Compressors

Compressors are there to screen out loud peaks in audio. This usually helps to get a fuller, louder sound without reaching the clipping limits. Some claim that you can't employ enough compressors, but you must use them properly. It's not recommended to put the whole mixdown through a single band compressor, this usually results in pumping sound. Use compressors on single channels of your mix, especially on drums. Again I recommend to use at least 2 different compressors for your drum / percussion sections. I always route high frequency drums (Hihats, Cyms, Claps etc.) through one compressor, and the low frequency ones (Bassdrums, Toms etc.) through another one. You'll have to experiment a bit with the settings of the compressor to get your results, there's no basic rules for that.


The following settings should be basically found on every compressor device:

  • Threshold
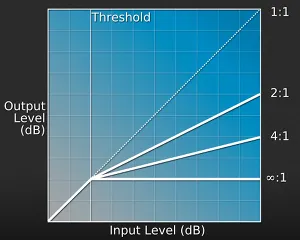
    The Threshold setting defines the volume level, from which above peaks will be affected by compression. That means: if you compress voice for example, and there's a loud sibilant exceeding the threshold level, it will be compressed. Special multiband compressors for exactly that task are called de-esser by the way.

  • Ratio
    Means the relative amount of compression. A ratio of 2:1 for example would reduce the waves between threshold and peak to 50% (in graphical display: to half height). The higher the ratio, the more a compressor is becoming a limiter. A limiter is a compressor with a ratio set to a very high setting (like 1:16, or in some cases 1:infinite). This explains the term: the wave material is being limited to the peak volume defined by the threshold value.

  • Attack/Release
    Here you can slow down the reaction times of the compressor. With drum sounds for example, it's often good to delay the attack of the compression. When the compressor detects a sharp attack, it will set in only after the attack time, and the first milliseconds of the drum won't be compressed. So the percussive drive of the sound is preserved. A suitable release setting helps with reducing unwanted pumping effects: the compression effect slowly fades away during the release time, after the audio signal is gone.

  • Sidechaining
    If your compressor supports sidechaining, you can use one source audio signal to compress another. Know that pumping effect in house music (popular in "Call on me" by Eric Prydz)? That is usually achieved by sidechaining. Sidechain the bassdrum into a melody loop or a pad-like instrument's compressor, et voila. You may also use an otherwise inaudible signal for sidechaining, that way you can control the pumping effect independent of the bassdrum. You can do a lot of creative things with the sidechain, or pretty basic ones like getting a cleaner sound by ducking the bassline with the bassdrum.

Audio Mastering


Figure: Compression ratio and threshold

Figure: Compression ratio and threshold


Ducking / Pumping effect through sidechaining example: LMan - Starchaser

Mixing and EQ: how to achieve that clean sound

You will improve your mixdown, if you keep every track in it's own frequency range. That means: Don't have too much bass in lead sounds, else you'll get your bass track all muddy. Don't have too much treble in lead sounds, or you'll drown your hihats. Don't have too much mid frequencies in your hihats, or you'll interfere with your lead sounds. You see where I'm getting at? It's just a pointer to keep your tracks acoustically separated - which results in a crystal clear sound. And don't be shy about it, this technique is the key.


Also avoid placing all the sounds at the stereo center. By moving accompanying elements left and right, you'll free up frequencies in the panorama and add depth to the mix.


Remove rumble from your channels by cutting away VERY low frequencies with a steep high pass filter set to about 20-30 Hz. That rumble might mud your mixdown without you realizing it. Those frequencies are rather felt than heard. It is also recommended to keep the very low bass sounds in the stereo center. Your ears cannot locate deep bass sounds anyway, that's why there is only one subwoofer in your 2.1 soundsystem.


Apparently it is useful to have good monitoring speakers when you are mixing/mastering. If you don't own one of these (like me), I recommend listening to the mix on various gear (headphones, big/small speakers, car) to detect flaws in your mixing. You should readjust mixing at least once after an appropriate break for your ears (preferably on the next day). You'll find it sounding very different from the day before… 😊 Walk through the room to get different impressions of your mix. There can be resonant spaces in your room, where i.e. bass frequencies sound very much louder than elsewhere. It also often helps to compare your mixing to a well-produced tune resembling the style you want to create.


Update 2020: I've now obtained a set of Yamaha HS-8 monitor speakers. It is indeed a whole different world, and making the mastering job so much easier. It also reveals all the flaws in my previous mixes that just were not perceivable on my old gear. So actually saving up on decent monitors is definitely worth it.


Still not getting a clear mix?

Start your mixing from scratch. Set all your faders to silence. Remove all the reverb and delay effects you thought you'd need during the creation of your track. Then, one by one, bring the channels back. Control their frequency ranges and panoramic positions. Leave the effects away for now. You'll see that your new mix will most likely have become crisper and cleaner.


Then consider bringing the reverb and delay effects back, but often less is more. I advise not to adjust those effects when wearing headphones, as you'll probably make your tracks too wet.


The following audio sample demonstrates a muddy mixing setup with all equalizers off. You can hardly make out some of the sounds, especially in the bass region.


"X98" with muddy mixing


The same audio clip, this time low and high shelf equalizers were used to put each channel into its own frequency range, and some sounds were moved away from the stereo center. The master levels and everything else is the same - see what difference mostly removing frequency ranges and subtle boosting can make?


"X98" with clean mixing

OK, now I got a clean sound - but my trebles sound so harsh

Pure digital productions suffer from their absolute reproduction accuracy in a way that many such recordings sound harsh, metallic, and thin. We'll only scratch the surface of this issue here, to make a long story short: the imperfections of analogue gear, especially tape recorders, produce a series of non-linear frequency ranges and harmonic distortions that sound pleasant and warm to the human ear. Publishers of modern software and digital hardware gear put a lot of effort in emulating those flaws to achieve what is commonly referred to as analogue warmth. The most obvious way to remove some harshness is to employ a tape machine emulation plugin. Treating your hi-hats, softsynths and other treble-heavy channels like that can work wonders on your production. Nowadays I tend to add subtle tape emulation or harmonic distortion to almost every channel, to get rid of that digital-esque sound and achieve a warmer output.

Free tape simulation VST


Exporting your mixdown for mastering in external tools (like Wavelab or Audacity)

Most modern Digital Audio Workstations provide useful facilities for mastering. But in case you wish to master your track in your wave editor, or if you wish for someone else to do the mastering for you, you'll want to send a high-quality, uncompressed wave file. Export the mixdown with 44100 Hz, and a minimum of 24 bit resolution to prevent digital noise or loss in dynamics. Don't use any master bus compression at this stage if you want to master in another tool! Do not export at higher frequencies, since the later conversion back to 44.100 Hz will be lossy. Hint: It's not necessary to run a normaliser based on maximum peak level, the final limiting/dithering unit should take care of that.


Mastering

You may use a multiband compressor as a master bus effect now to punch up, or to soften down certain frequency ranges of your tune. It might help you get closer to the soundscape you desire, however getting your mixing right in the first place might be the better option.


The maximizer (aka Master Bus Compressor / Limiter) is the final and the most vital tool when mastering, it will push your loudness to the max and give your track that pro sound. The dithering unit of your mastering tool should be set to 16 bit dithering (for CD-compatibility) - most likely there'll be a preset for that. Now adjust the threshold level to gain as much volume as possible without losing dynamic vitality of the tune (and without causing distortion/clipping). The better and cleaner your mix is, the more you can push the gain. Do it, but don't overdo it - find a level that is suitable for your production - see Loudness War below.


There are numerous mastering VST and DirectX plugins, logically their quality will also affect the quality of your end result. Now you can export your 16-bit 44100 Hz audio file for burning on CD and / or mp3 compression.


Loudness war

Competing for the loudest mix on the radio, professional audio engineers have pushed their compressors and limiters to the max. They've done it so cleverly, that most of the time you're not realizing you're actually listening to distorted music with little dynamic space. This competition has been coined as Loudness War. Surely you have perceived, that advertisement on TV seems to be much louder than your favourite episode of Star Trek - advertisers employ extreme compression just to get your attention.


While your average CD track is limited to 16bit of room for its soundwave's amplitude, using these techniques increases the perceived loudness of a song without breaking this limit. To measure perceived loudness, various scales are employed, the most well-known is probably the VU scale. A lot of factors contribute to the actual perceived loudness, and since it is in fact a subjective measure, all those scales can only serve as a loose guide in that matter. But let's not delve too deep into this science, for a science of its own it is.


For us amateur sound engineers, wave file editors like Audacity or Wavelab supply methods of calculating the average RMS peak, which will usually return a dB or dBFS value. That value can serve us as a rough guide for finding a proper loudness level. Select about 15 seconds of the loudest part of your song, and run an analysis for the average RMS peak.


Using this method, modern dance tracks measure about -8 or -9 dBFS (RMS), where values closer to zero means louder. Personally I'm not mastering that loud, your track should at least have some room for breathing and dynamics. As a compromise between competitive audibility and preserving dynamics, I've settled for around -11 dBFS (RMS). Fortunately, there are counter movements in the league of audio engineers, who are trying to end this madness.


Mastering your album for CD

If you're releasing an album on CD, consider the following guidelines.

  • Make sure all your tracks are about the same loudness level (see Loudness War). You don't want your listeners to jump to their volume knob each time a new track begins to play!

  • Some playback devices swallow the first couple of milliseconds of your tune. If your tune starts with a kick, that effect is painfully audible. To avoid this, insert 0,5 seconds of silence into the beginning of each of your wave files.

  • A few cheap and old CD players might produce audible clicks if your mixdown touches the -0 dB threshold. To accommodate those, have a tiny headroom of maybe -0.2 dB in your mixdown

  • Per standard, you should have 2 seconds of silence separating the track. You'll find a feature for this in most audio CD burning tools.

Thank you

…for reading my humble tutorial!


- LMan

markus-klein-artwork.de


If you have suggestions for improving the tutorial, please contact me through my profile page


Acknowledgements:

Thank you k8-bit for pointing out the digital harshness issue, and the link to the tape simulation VST.

Thank you Romeo Knight for elaborately and expertly setting the facts straight in the loudness war section.